
Do you remember the first day of a new school? Everything seemed so BIG, but over time things became familiar… almost smaller.
The same goes for learning a new piece of software.
Let’s take a tour of Audacity’s Toolbars so you won’t be overwhelmed with all the bells & whistles!
THE TOOLBARS OF AN AUDACITY PROJECT
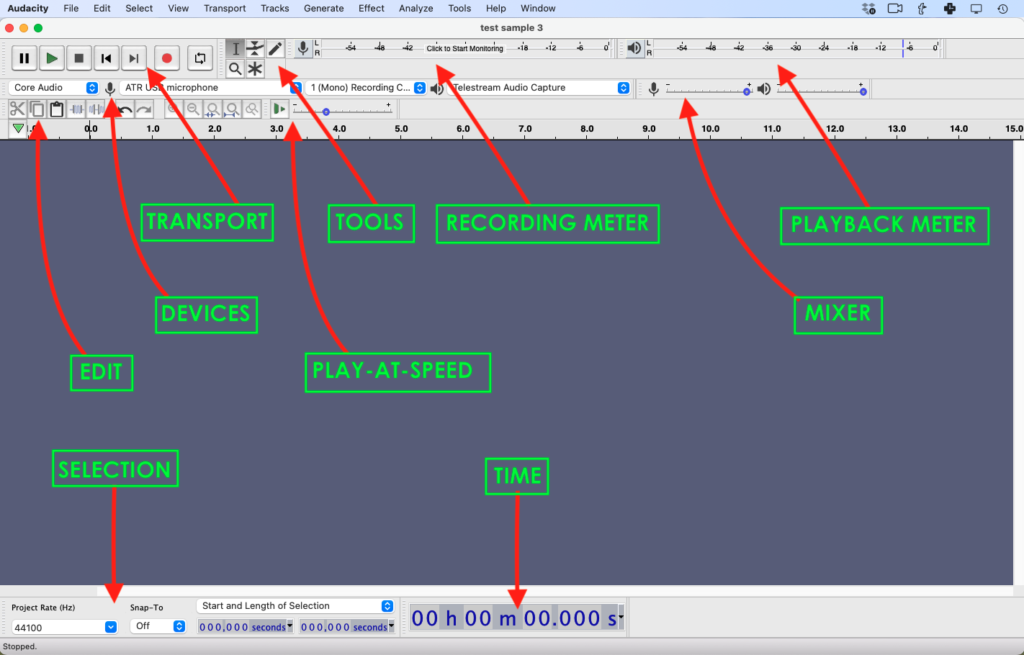
1) Transport toolbar
- Pause
- Play
- Stop
- Skip to beginning or end
- Record
- Loop
Note: The appearance and arrangement of these buttons in Windows may appear different than in the video and screenshot, but they work identically
2) Tools toolbar
- Selection
- Envelope
- Draw
- Zoom
- and Multi-Tool Mode
Note: The Time Shift tool from older versions of Audacity is now incorporated in the header of the Tracks, so it no longer has a tool button. Sync-Lock Tracks has also been removed from the tools menu and can now be found under Tracks in the Menu bar.
3) Meter toolbars
Visual representation of your input and output levels.
- Green is good
- Yellow is “hey, watch what you’re doing”
- Red is too loud. Back down a bit to avoid distortion or clipping (when the sound will cut out)
Tip: The Recording Meter allows you to monitor the input prior to pressing record. This is an easy way to test your levels prior to your recording.
Tip: Click on the arrow below the microphone icon or the speaker icon to adjust the meter’s refresh rate as well as the way the levels are measured and displayed.
4) Device toolbar
- Select different input devices like microphones, interfaces, and mixers
- Choose to record in Mono or Stereo
- Select the output device for monitoring (usually built-in speakers or external headphones)
5) Mixer toolbar
Adjusts the volume of input and output devices.
Note: Some programs or system settings can override Audacity’s input and output settings
6) Edit Toolbar
- Cut, Copy, Paste (like in Word)
- Trim Audio (outside of selection)
- Silence (what has been selected)
- Undo and Redo
- Zoom In, Zoom Out
- Zoom into Selection only
- Zoom out to entire project
- Zoom Toggle
7) Play-at-Speed Tool
This fun little button makes people sound like chipmunks or hung over. It will help you speed through a recording while looking for ummms and uhhhhs (More about that in another video).
I have also found it useful for taking notes or taking transcription because I type slower than most people talk – this way I can keep up!
8) Selection Toolbar
- Project Rate
- Snap to
- How you want to see times displayed (I use Start & End of Selection or Start and Length of Selection)
- Also, how you want to display the time or timestamps (seconds, milliseconds, frames, etc)
9) Time Tool
- Tells you where the cursor is on the timeline
- Settings are similar to the Selection toolbar
We are almost done with the Audacity Tour, but there’s one more I need to show you with some really cool features – and places to go when you don’t know what Audacity is doing!
TOOLBAR TIPS
- Toolbars can be moved almost anywhere on the screen
- The size of some toolbars can be altered, like the Device or Meter bars
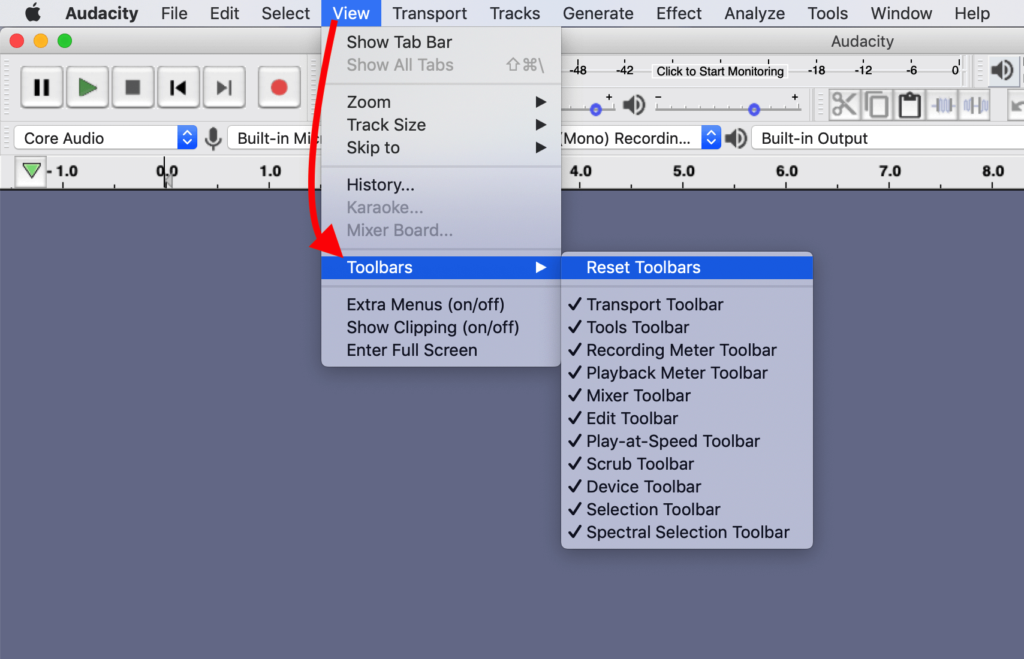
- Hide Toolbars you don’t need by going to View > Toolbars
- Reset all Toolbars at once by going to View > Toolbars > Reset Toolbars